| Program Banner |
======================================================================
Armadillo Project Manager
----------------------------------------------------------------------
Software Version:      Version 1.1
Created by:            Jeff Hamblin & Bruce Atkinson of Twisted DIRT
Project Log File:      Generic_Changes.txt
|
| SCN Update Section
|
======================================================================
Looking for SCN file updates...

Cube File Update ----> test.cub
Modified Sun Pos. ---> TargetPosition=1801.000000,199.000000,800.000000
Modified Fog Color --> ColorRGB=172,173,68
Modified Ambient ----> ColorRGB=100,100,100
Modified Sun Color --> ColorRGB=255,255,240
Updated/Confirmed ---> CrowdPresent=F
Sound update --------> Adding StaticSound1
Sound update --------> Adding StaticSound2
Sound update --------> Adding StaticSound3
Sound update --------> Adding StaticSound4
Sound update --------> Adding StaticSound5
Sound update --------> Adding StaticSound6
Sound update --------> Adding StaticSound7
Sound update --------> Adding StaticSound8
Sound update --------> Adding StaticSound9
Sound update --------> Adding StaticSound10
Sound update --------> Adding StaticSound11
Sound update --------> Adding StaticSound12
Sound update --------> Adding StaticSound13
Sound update --------> Adding StaticSound14
Sound update --------> Adding StaticSound15
Sound update --------> Adding StaticSound16
Sound update --------> Adding StaticSound17

Complete.
|
| SLT Search Section
|
======================================================================
Searching for SLT files...

Found Model#011 -----> Astar_White
Found Model#012 -----> Astar_White
Found Model#009 -----> honda_white_sign
Found Model#010 -----> honda_white_sign
Found Model#015 -----> honda_white_sign
Found Model#016 -----> honda_white_sign
Found Model#024 -----> honda_white_sign
Found Model#007 -----> oneal_white_sign
Found Model#008 -----> oneal_white_sign
Found Model#013 -----> Scott_blue
Found Model#014 -----> Scott_blue
Found Model#001 -----> TdBale2
Found Model#002 -----> TdBale2
Found Model#003 -----> TdBale2
Found Model#004 -----> waypthc-1-5x-01_01
Found Model#005 -----> waypthc-1-5x-01_01
Found Model#006 -----> waypthc-1-5x-01_01

Search Complete.  17 SLT file(s) found.
|
| SLT Rename Section
|
======================================================================
Numbering duplicate SLT files and renaming...

New SLT name --------> SLTFiles\Astar_White_TD_001.slt
New SLT name --------> SLTFiles\Astar_White_TD_002.slt
New SLT name --------> SLTFiles\honda_white_sign_TD_001.slt
New SLT name --------> SLTFiles\honda_white_sign_TD_002.slt
New SLT name --------> SLTFiles\honda_white_sign_TD_003.slt
New SLT name --------> SLTFiles\honda_white_sign_TD_004.slt
New SLT name --------> SLTFiles\honda_white_sign_TD_005.slt
New SLT name --------> SLTFiles\oneal_white_sign_TD_001.slt
New SLT name --------> SLTFiles\oneal_white_sign_TD_002.slt
New SLT name --------> SLTFiles\Scott_blue_TD_001.slt
New SLT name --------> SLTFiles\Scott_blue_TD_002.slt
New SLT name --------> SLTFiles\TdBale2_TD_001.slt
New SLT name --------> SLTFiles\TdBale2_TD_002.slt
New SLT name --------> SLTFiles\TdBale2_TD_003.slt
New SLT name --------> SLTFiles\waypthc-1-5x-01_01_TD_001.slt
New SLT name --------> SLTFiles\waypthc-1-5x-01_01_TD_002.slt
New SLT name --------> SLTFiles\waypthc-1-5x-01_01_TD_003.slt

Complete.  17 SLT file name(s) processed.
|
| Object Sound Section
|
======================================================================
Searching for object sound to process...

Object sound added --> Model4
Object sound added --> Model9

Complete.
|
| Object Sound Section
|
======================================================================
Processing INI file updates...

Adding --------------> FileSet_8=test.cub
Adding --------------> FileSet_9=D:\MCM2\TrackEditor\UserModels\SLTFiles\Astar_White_TD_001.slt
Adding --------------> FileSet_10=D:\MCM2\TrackEditor\UserModels\SLTFiles\Astar_White_TD_002.slt
Adding --------------> FileSet_11=D:\MCM2\TrackEditor\UserModels\SLTFiles\honda_white_sign_TD_001.slt
Adding --------------> FileSet_12=D:\MCM2\TrackEditor\UserModels\SLTFiles\honda_white_sign_TD_002.slt
Adding --------------> FileSet_13=D:\MCM2\TrackEditor\UserModels\SLTFiles\honda_white_sign_TD_003.slt
Adding --------------> FileSet_14=D:\MCM2\TrackEditor\UserModels\SLTFiles\honda_white_sign_TD_004.slt
Adding --------------> FileSet_15=D:\MCM2\TrackEditor\UserModels\SLTFiles\honda_white_sign_TD_005.slt
Adding --------------> FileSet_16=D:\MCM2\TrackEditor\UserModels\SLTFiles\oneal_white_sign_TD_001.slt
Adding --------------> FileSet_17=D:\MCM2\TrackEditor\UserModels\SLTFiles\oneal_white_sign_TD_002.slt
Adding --------------> FileSet_18=D:\MCM2\TrackEditor\UserModels\SLTFiles\Scott_blue_TD_001.slt
Adding --------------> FileSet_19=D:\MCM2\TrackEditor\UserModels\SLTFiles\Scott_blue_TD_002.slt
Adding --------------> FileSet_20=D:\MCM2\TrackEditor\UserModels\SLTFiles\TdBale2_TD_001.slt
Adding --------------> FileSet_21=D:\MCM2\TrackEditor\UserModels\SLTFiles\TdBale2_TD_002.slt
Adding --------------> FileSet_22=D:\MCM2\TrackEditor\UserModels\SLTFiles\TdBale2_TD_003.slt
Adding --------------> FileSet_23=D:\MCM2\TrackEditor\UserModels\SLTFiles\waypthc-1-5x-01_01_TD_001.slt
Adding --------------> FileSet_24=D:\MCM2\TrackEditor\UserModels\SLTFiles\waypthc-1-5x-01_01_TD_002.slt
Adding --------------> FileSet_25=D:\MCM2\TrackEditor\UserModels\SLTFiles\waypthc-1-5x-01_01_TD_003.slt
Adding --------------> FileSet_26=Generic.cmp
Adding --------------> FileSet_27=Generic.tex
Adding --------------> FileSet_28=Wind01.wav
Adding --------------> FileSet_29=airplane01.wav
Adding --------------> FileSet_30=Applause03.wav
Adding --------------> FileSet_31=EagleSound.wav
Adding --------------> FileSet_32=WRECK06.wav
Adding --------------> FileSet_33=zepplin.wav
Adding --------------> FileSet_34=Applause01.wav
Adding --------------> FileSet_35=airplaneidle03.wav
Adding --------------> FileSet_36=truckidle02.wav
Adding --------------> FileSet_37=WRECK01.wav

Complete.
|
| File Update Section
|
======================================================================
Replacing existing project files with processed ones...

INI file ------------> Replaced
INI file ------------> Attributes restored
SCN file ------------> Replaced
SCN file ------------> Attributes restored

Complete.
|
| MakeCMP Section
|
======================================================================
Data from Rainbow's makecmp.log file...

Building ColorMap...
Adding To ColorMap A-Star_white.tga...
Adding To ColorMap honda_white_sign.tga...
Adding To ColorMap oneal_white_sign.tga...
Adding To ColorMap Scott_blue.tga...
Adding To ColorMap TdBale2.tga...
Adding To ColorMap tDarch-256x.tga...
Finding 256 colors...
Counting files...
Making TextureMap A-Star_white.tga...
Storing 1 x 1 texture in chain A-Star_white.tga
Storing 2 x 2 texture in chain A-Star_white.tga
Storing 4 x 4 texture in chain A-Star_white.tga
Storing 8 x 8 texture in chain A-Star_white.tga
Storing 16 x 16 texture in chain A-Star_white.tga
Storing 32 x 32 texture in chain A-Star_white.tga
Storing 64 x 64 texture in chain A-Star_white.tga
Storing 128 x 128 texture in chain A-Star_white.tga
Storing 256 x 256 texture in chain A-Star_white.tga
Making TextureMap honda_white_sign.tga...
Storing 1 x 1 texture in chain honda_white_sign.tga
Storing 2 x 2 texture in chain honda_white_sign.tga
Storing 4 x 4 texture in chain honda_white_sign.tga
Storing 8 x 8 texture in chain honda_white_sign.tga
Storing 16 x 16 texture in chain honda_white_sign.tga
Storing 32 x 32 texture in chain honda_white_sign.tga
Storing 64 x 64 texture in chain honda_white_sign.tga
Storing 128 x 128 texture in chain honda_white_sign.tga
Storing 256 x 256 texture in chain honda_white_sign.tga
Making TextureMap oneal_white_sign.tga...
Storing 1 x 1 texture in chain oneal_white_sign.tga
Storing 2 x 2 texture in chain oneal_white_sign.tga
Storing 4 x 4 texture in chain oneal_white_sign.tga
Storing 8 x 8 texture in chain oneal_white_sign.tga
Storing 16 x 16 texture in chain oneal_white_sign.tga
Storing 32 x 32 texture in chain oneal_white_sign.tga
Storing 64 x 64 texture in chain oneal_white_sign.tga
Storing 128 x 128 texture in chain oneal_white_sign.tga
Storing 256 x 256 texture in chain oneal_white_sign.tga
Making TextureMap Scott_blue.tga...
Storing 1 x 1 texture in chain Scott_blue.tga
Storing 2 x 2 texture in chain Scott_blue.tga
Storing 4 x 4 texture in chain Scott_blue.tga
Storing 8 x 8 texture in chain Scott_blue.tga
Storing 16 x 16 texture in chain Scott_blue.tga
Storing 32 x 32 texture in chain Scott_blue.tga
Storing 64 x 64 texture in chain Scott_blue.tga
Storing 128 x 128 texture in chain Scott_blue.tga
Storing 256 x 256 texture in chain Scott_blue.tga
Making TextureMap TdBale2.tga...
Storing 1 x 1 texture in chain TdBale2.tga
Storing 2 x 2 texture in chain TdBale2.tga
Storing 4 x 4 texture in chain TdBale2.tga
Storing 8 x 8 texture in chain TdBale2.tga
Storing 16 x 16 texture in chain TdBale2.tga
Storing 32 x 32 texture in chain TdBale2.tga
Storing 64 x 64 texture in chain TdBale2.tga
Storing 128 x 128 texture in chain TdBale2.tga
Storing 256 x 256 texture in chain TdBale2.tga
Making TextureMap tDarch-256x.tga...
Storing 1 x 1 texture in chain tDarch-256x.tga
Storing 2 x 2 texture in chain tDarch-256x.tga
Storing 4 x 4 texture in chain tDarch-256x.tga
Storing 8 x 8 texture in chain tDarch-256x.tga
Storing 16 x 16 texture in chain tDarch-256x.tga
Storing 32 x 32 texture in chain tDarch-256x.tga
Storing 64 x 64 texture in chain tDarch-256x.tga
Storing 128 x 128 texture in chain tDarch-256x.tga
Storing 256 x 256 texture in chain tDarch-256x.tga
Freeing memory
Done processing C:\Mcm2\TrackEditor\Projects\Generic\Generic_ObjectTGA\APM_UserModels.ini

Complete.
|
|
|
File Validation Section
|
======================================================================
Verifying FileSets and processing duplicate SLT files...

OK ------------------> Generic.tdf
Optional ------------> Generic.esb
OK ------------------> Generic.scn
OK ------------------> Generic.trn
Optional ------------> Generic.seg
OK ------------------> Generic.tga
OK ------------------> GenericS.tga
OK ------------------> test.cub
OK ------------------> D:\MCM2\TrackEditor\UserModels\SLTFiles\Astar_White_TD_001.slt
OK ------------------> D:\MCM2\TrackEditor\UserModels\SLTFiles\Astar_White_TD_002.slt
OK ------------------> D:\MCM2\TrackEditor\UserModels\SLTFiles\honda_white_sign_TD_001.slt
OK ------------------> D:\MCM2\TrackEditor\UserModels\SLTFiles\honda_white_sign_TD_002.slt
OK ------------------> D:\MCM2\TrackEditor\UserModels\SLTFiles\honda_white_sign_TD_003.slt
OK ------------------> D:\MCM2\TrackEditor\UserModels\SLTFiles\honda_white_sign_TD_004.slt
OK ------------------> D:\MCM2\TrackEditor\UserModels\SLTFiles\honda_white_sign_TD_005.slt
OK ------------------> D:\MCM2\TrackEditor\UserModels\SLTFiles\oneal_white_sign_TD_001.slt
OK ------------------> D:\MCM2\TrackEditor\UserModels\SLTFiles\oneal_white_sign_TD_002.slt
OK ------------------> D:\MCM2\TrackEditor\UserModels\SLTFiles\Scott_blue_TD_001.slt
OK ------------------> D:\MCM2\TrackEditor\UserModels\SLTFiles\Scott_blue_TD_002.slt
OK ------------------> D:\MCM2\TrackEditor\UserModels\SLTFiles\TdBale2_TD_001.slt
OK ------------------> D:\MCM2\TrackEditor\UserModels\SLTFiles\TdBale2_TD_002.slt
OK ------------------> D:\MCM2\TrackEditor\UserModels\SLTFiles\TdBale2_TD_003.slt
OK ------------------> D:\MCM2\TrackEditor\UserModels\SLTFiles\waypthc-1-5x-01_01_TD_001.slt
OK ------------------> D:\MCM2\TrackEditor\UserModels\SLTFiles\waypthc-1-5x-01_01_TD_002.slt
OK ------------------> D:\MCM2\TrackEditor\UserModels\SLTFiles\waypthc-1-5x-01_01_TD_003.slt
OK ------------------> Generic.cmp
OK ------------------> Generic.tex
Internal ------------> Wind01.wav
Internal ------------> airplane01.wav
Internal ------------> Applause03.wav
OK ------------------> EagleSound.wav
Internal ------------> WRECK06.wav
Internal ------------> zepplin.wav
Internal ------------> Applause01.wav
Internal ------------> airplaneidle03.wav
Internal ------------> truckidle02.wav
Internal ------------> WRECK01.wav

Success!!  No errors found.
|
| Pass/Fail Banner |
======================================================================


APM Processing Complete!
|
How it works
Background
The normal way of doing objects with MCM2 and Armadillo has a few problems. I will explain briefly how it works out of the box and then what the problems are.
Armadillo
Armadillo searches the \TrackEditor\UserModels folder for custom user made objects. These objects are defined by 3 files:
- SLT file - Text file that describes the structure of the object
- TGA file - Pointed to by the SLT file and this is the texture of the object
- _art.tga file - This is the picture that Armadillo will use in the object selection drop down menu.
If you place the appropriate files in the UserModels folder then they will show up in Armadillo. You will be able to place multiple copies of them and they will work in Armadillo. The information for Armadillo is saved in the projects .SCN file.
MCM2
MCM2 does not use the same scheme for finding the objects. When the track is bundled the .SCN is used as well as statements that need to be added to the projects .INI file. The _art.tga file is ignored and the objects texture (TGA) needs to be processed by MakeCMP, which will convert them to 3 files (CMP/TEX/PAL). These files will be needed when the track is bundled.
Problems
If you have the objects working in the editor then a problem will result if you use two or more instances of the same object. The editor will work fine but MCM2 will have problems after you exit the track that is using these multiple instances of the same object. The solution is to either not place multiple instances of an object or to use the technique that APM does.
If your objects do not work in the editor then be sure to check out the tutorial on Twisted DIRT's web site.
How APM works
After much experimentation by several people at Twisted DIRT and testing a ton of scenarios it was discovered that we could work around the problem by creating seperate SLT files for each instance. To save memory we found that we could point all of the duplicate SLT's to the same texture TGA. To make this simpler I created the original Multi Object Assistant (MOA) program, now replaced by the Armadillo Project Manager (APM).
The way APM works is by finding all user made objects in your projects .SCN file and then renaming them using the following naming scheme. Each custom object is renamed with an "_TD_xxx" appended to the end. The xxx is replaced with a number. If you had 6 instances of the same object then your .SCN would contain "yourobject_TD_001" through "yourobject_TD_006". In addition the .SCN is redirected to find your SLT files in the SLTfiles sub folder of UserModels. The APM program automatically creates these extra SLT files for you.
APM processes all of the .SCN entries and then based on what it finds it creates the appropriate INI file adding lines for each SLT file and lines for your custom CMP and TEX files. If you direct APM to do so it will gather up all of the TGA files required and build the CMP and TEX files as well.
In addition if the file {ProjectName}_Sound.ini exists, then all of the sound statements included in the _Sound.ini file will be added to your .SCN file. Unlike MOA, APM contains several user interface screens to assist you in creating the sound entries.
Finally a pass is made over the INI to verify that the files exist. If you reference objects that need duplicate SLT's then it will check for their existence and create any that are needed by your project.
NOTE: Whenever you modify an existing object then you should go into the SLTFiles directory and delete all of the duplicate SLT's in that directory for that object. The next time that you run APM, the duplicate SLT's will be created.
The bottom line is that it sounds more complicated then it really is to use it. You just need to run APM after each time you save your project. Then the next time you bundle your project, the files are setup properly so that it will work in MCM2. You should always remember to run APM after you save even if you don't plan to bundle. The next time that you start Armadillo your project may not work if you haven't run APM on it.
Top of Page
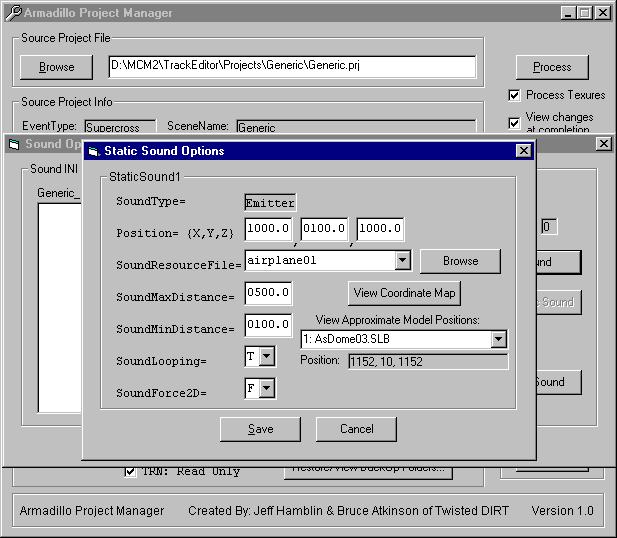
How to add sounds using APM
Be familiar with the Sound Tutorial
Before adding sounds using APM, you should read over the Twisted DIRT Sound Tutorial.
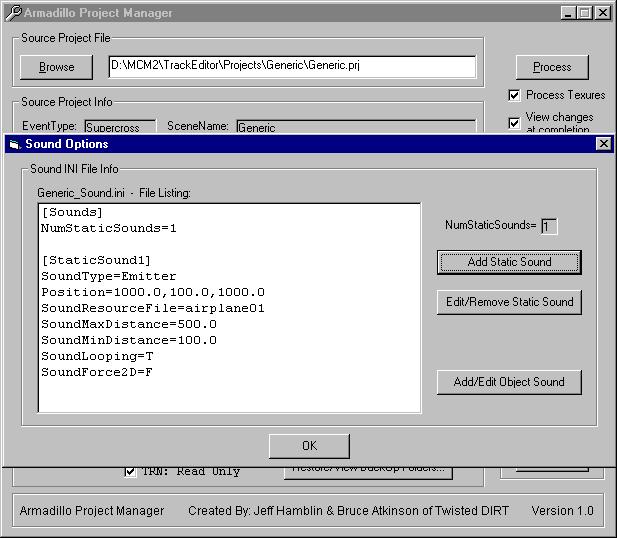
To add sounds to locations or objects in MCM2 certain statements have to be added to the .SCN file. These statements either go into [StaticSoundn] sections if it's a location. These sections are named [StaticSound1], [StaticSound2], etc. There is another section called [Sounds], which contains the line NumStaticSounds=n, where n equals the number of Static Sound sections that you have.
To add sound to objects most of the same sound statements are added to the appropriate Modeln section for that object in the .SCN file.
How they work in APM
Since every time that you save your project in Armadillo the .SCN file gets overwritten, these modifications to your .SCN file can be quite tedious. To resolve this, APM has a built in feature to take care of the sound issues. It does this by looking for a file called {ProjectName}_Sound.ini where {ProjectName} is the name of your project. If the file exists, APM will look for the following sections and update them in your .SCN. It looks for the [Sounds] section to determine how many static sound sections that there are. It will then copy each StaticSoundn section that it finds up to the number contained on the NumStaticSounds line.
[Sounds]
NumStaticSounds=2

[StaticSound1]
SoundType=Emitter
Position=1000.0,100.0,1000.0
SoundResourceFile=airplane01
SoundMaxDistance=500.0
SoundMinDistance=100.0
SoundLooping=T
SoundForce2D=F

[StaticSound2]
SoundType=Emitter
Position=1450.0,25.0,1600.0
SoundResourceFile=Wind01
SoundMaxDistance=150.0
SoundMinDistance=10.0
SoundLooping=T
SoundForce2D=F

[Model4]
SoundResourceFile=truckidle02
SoundMaxDistance=100.0
SoundMinDistance=15.0
SoundLooping=T
SoundForce2D=F

[Model9]
SoundResourceFile=WRECK01
SoundMaxDistance=150.0
SoundMinDistance=10.0
SoundLooping=T
SoundForce2D=F
The above {ProjectName}_Sound.ini will add two static sounds at postion 1000,100,1000 and 1450,25,1600 using the built in sound files airplane01.wav and Wind01.wav respectively. It will also add sound to two objects: Model number 4 and Model number 9. Model 4 will use the truckidle02.wav file and model 9 will use the WRECK01.wav file.
Because of all the editing that you can do and there is no way that we can synchronize with Armadillo, it is important to place your objects that you want to add sound to as your first objects. You want to try to maintain their numbering. If you place them first and don't delete any objects before them then you won't have a problem. If you delete objects that are a lower number then the model numbers in your {ProjectName}_sound.ini file then you will have to figure out what their new Model numbers are and edit your _Sound.ini file manually.
With APM's extensive user interface screens for entering sound information, editing the _Sound.ini file should be a breeze. You enter the data mentioned above much like the following picture:
Each time you enter/edit an entry your {ProjectName}_Sound.ini file gets updated and displayed as shown in the following picture:
Top of Page
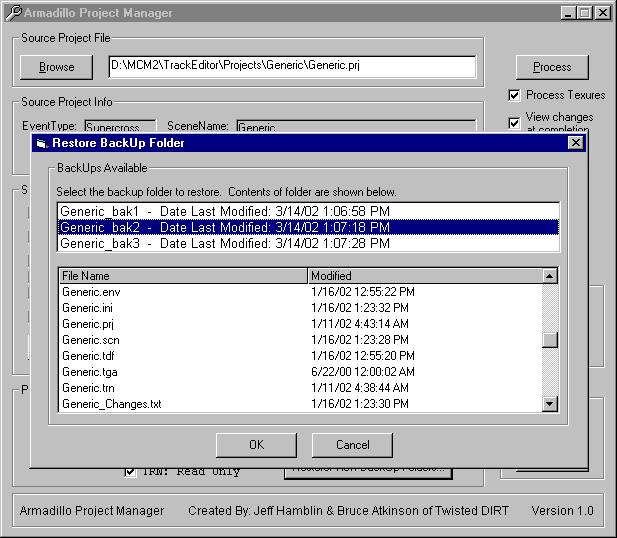
Using the BackUp Feature
Anyone who has ever used Armadillo for very long should know that the program is prone to crashing and/or corrupted projects. Sometimes there are clear reasons why it happens, other times it's just bugs in the software. No matter what the reason is, YOU NEED TO BACKUP YOUR PROJECTS!! In APM there is a very simple and easy to use BackUp feature that will allow you to keep a maximum of three BackUps. More than three BackUps can be created but the oldest BackUp will be lost. The process works like this:
1st Backup ---> Backup all files in project folder to subfolder {ProjectName}_Bak1
2nd Backup ---> Backup all files in project folder to subfolder {ProjectName}_Bak2
3rd Backup ---> Backup all files in project folder to subfolder {ProjectName}_Bak3
After the third 3rd backup shift backups downward...
1st Backup ---> Deleted
2nd Backup ---> Renamed as 1st Backup
3rd Backup ---> Renamed as 2nd Backup
nth Backup ---> Backed up as 3rd Backup
Each of these BackUps can be restored using the Restore feature. The following picture demonstrates what this looks like: