
|
|
|||||||||
 |
||
|
|
Motocross
Madness 2
Armadillo track editing tutorial probability map tips and info |
|
|
|
A "probability map" is a normal Photoshop 24-bit image that defines the probability of a tree showing up at a given location on the terrain. It does NOT guarantee a tree will go there, but it CAN prevent a tree from going there. To make a Nats probability map: Create a 24-bit TGA at 1280x1280 resolution. Pure white colors yield high probability of a tree going there. Black yields zero probability a tree will go there. 128,128,128 grey = 50% probability and so on. It works just like a displacement, only brightness equates to higher probability of tree placement rather than terrain height. Once you've painted your map, rotate it 90 counter clockwise. This is dumb. There is a bug I can't fix tonight. Save the 24-bit targa in the same folder as your armadillo project, named the exact same as your base project name, with a "_prob" attached to the file. For example: You have a project named myfirst.prj Name your probability map myfirst_prob.tga Paint your prob maps BLACK everywhere you DO NOT want trees to show up ever, such as on your track. Also, paint your prob maps black everywhere you place 3D models and DO NOT want trees to show up sticking through the object.
|
|
|
The info
in the excerpt above is straight forward; refer to it for the basics.
The explanation below was realized from mistakes I made while learning
to use probability maps I hope they help you with your designs.
|
||
|
You may
have noticed that the readme makes no mention of Stunt, Enduro,
Baja, or Tag layout instructions. This is what works for me:
|
||
|
|
||
|
Is
there a 257 or 513 size grid?
|
||
|
I
hope this tutorial was helpful. Please contact me with any comments
or questions... I would love to hear from you.
|
||

 begin
by refering to this excerpt from the ReadMe.txt included in the
begin
by refering to this excerpt from the ReadMe.txt included in the 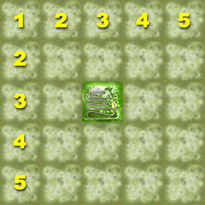 The
1280x1280 pixel image represents more than just the track tile. This
is not made clear in the read me. While the familiar Displacement
and Texture maps used in Armadillo are sized per tile the Probability
map is sized for the whole MCM2 environment or universe.
The
1280x1280 pixel image represents more than just the track tile. This
is not made clear in the read me. While the familiar Displacement
and Texture maps used in Armadillo are sized per tile the Probability
map is sized for the whole MCM2 environment or universe.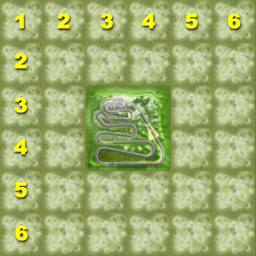 Use
a 1536x1536 pixel image with a 6x6 pixel grid. You may already be
aware that the 513x513 pixel Stunt, Enduro, Baja and Tag
Displacement maps you design are used to create the equivalent of
four tiles, rather than one, in the MCM2 environment.
Use
a 1536x1536 pixel image with a 6x6 pixel grid. You may already be
aware that the 513x513 pixel Stunt, Enduro, Baja and Tag
Displacement maps you design are used to create the equivalent of
four tiles, rather than one, in the MCM2 environment. This
is a too scale example of a 1536x1536 probability map I have used
successfully. It is very simple but it works just like it is supposed
too.
This
is a too scale example of a 1536x1536 probability map I have used
successfully. It is very simple but it works just like it is supposed
too. 
|
|||||||||
