 |
|
|
|
|

|
|
|
Motocross
Madness 2
 Armadillo
track editing tutorial
Armadillo
track editing tutorial
Track Pictures for User Made Tracks
by Maui_cool
|
| |
[This tutorial is for people who have some knowledge of photo editing
programs such as Photoshop & Paint Shop Pro and the MCM 2 Track Editor
"Armadillo".]
How To Make Pictures for User Made Tracks.
Track pictures are one of the easier parts of creating a "User Made
Track" for MCM2. I will tell you how to take a screenshot, get it
in a photo editor and how to get it in the game but you'll have to
use your own editing skills to make it look "Cool". If you already
know how take and use a screenshot, skip to "Step 3.".
1.
To take a "Screenshot" of your
track.
A.
Find the scene you want to take a pic of.
B.
Take a screenshot by pressing the "Print Scrn - SysRg" button on the
top of your keyboard.
[NOTE:
You can take multiple screenshots in Armadillo or MCM2 which will
be stored in either your "TrackEditor" folder or your MCM2 folder,
respectively,
and have a name like "(nameofyourcomputer)00001.tga, etc. Only the
last shot you take will be available on your system's "clipboard"
for pasting.]
2.
Importing a screenshot.
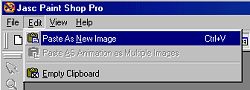
A.
Go to the photo program of your choice and import it by:
In Paint Shop Pro:
Click "Edit"
Click "Paste".
In Photoshop you can:
Go to "File".
Click "New".
Click "OK".
Go to "Edit".
Click "Paste".
3. Saving sizes and formating.
[NOTE:
There are 2 track pictures required. One for "Offline" racing and one
for "Online" racing. If you've noticed, the pic for "Online" racing
is much smaller than the pic for "Offline" racing.]
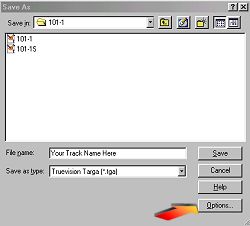
A.
Resize your finished pic to the required size of "452x220".
B.
Click "Save as".
C.
Name it: (yourprojectname).tga.
[NOTE:
Save both track pics to the folder where your track's project files are
located - usually your "TrackEditor/Projects" folder.]
D.
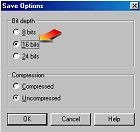
Then:
In "Paint Shop Pro":
Click "Options".
Check "16 bit".
Click "Save".
Click "OK".
Click "Save".
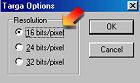
In "Photoshop":
Click "Save" and this box will pop up >>>>
Check "16 bit".
Click "Save".
E.
Now, resize it again to "286x139".
F.
Click "Save as".
G.
Name it: (yourprojectname)"S".tga (without the ").
H.
Repeat "Step D."
All you need to do now, is "bundle" your track.
The bottomline is:
resize them to "452x220 & 286x139", save them in "16 bit" format,
name the "452x220" (yourprojectname).tga and name the "286x139" the same
but add an "S" at the end of the name
and put them in the correct folder.
|
| |
'a'ohe mea hele hikiwale ma'alahi = Nothing comes easy.....
Aloha,
Maui_cool
Copyright © 2001 Maui_cool All rights reserved.
|

|
| |
 "Print Scrn" Button
|
|
|
| |
PSP Save Options |
|
|
Photoshop Save Options |
|
|
|
|
|
|
|
 |
|
|
 |