Motocross Madness 2

Armadillo track editing tutorial
Probability Map Tutorial
by Maui_cool


[This tutorial is for people who have some knowledge of photo editing programs such as Photoshop & Paint Shop Pro and the MCM 2 Track Editor "Armadillo".]

Pure white colors yield high probability of a tree going there. Black yields zero probability a tree will go there. 128,128,128 grey = 50% probability and so on. It works just like a displacement, only brightness equates to higher probability of tree placement rather than terrain height.

1. Make 4 480x480 24-bit tga images - 2 solid black, 2 solid white.

2. Put the black images in your "TextureMaps/Ontrack" and "TextureMaps/Edgetrack" folders.

3. Put the white images in your "TextureMaps/Offtrack" and "TextureMaps/Edgetrack" folders.

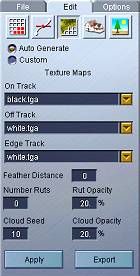
4. Start up Armadillo and open the track you want to make a probability map for, click the "Texture Maps" tab.

5. Selections:

  • In the "Ontrack" dropdown box, select "Black".
  • In the "Offtrack" dropdown box, select "White".
  • In the "Edgetrack" dropdown box, select "White".
  • Reduce the "Number Ruts" to "0".
  • Reduce the "Feather Distance" to "0".
  • [NOTE: You can also make the "Egdetrack" black if you don't want vegetation close to the edge of your track path.]

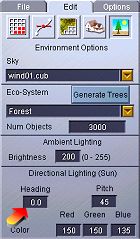
    [NOTE: You can get rid of the shadows, rendered by the directional lighting, by clicking the "Environment Options" tab and changing the "Heading" to "0", then clicking "Generate Trees" - do this before you click "Apply" under the "Texture Maps" tab.]

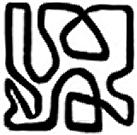
    6. Click "Apply" - your track path should be black and everything else should be white.

    7. Click the "Export" button, located near the bottom of the "Edit Textures" panel, give it a name - (yourtrack)_prob - and export it a folder you can find easily.

    8. Now exit the editor WITHOUT saving. Doing this will leave your track as it was before you opened it.

    9. Open a photo editing program - such as Photoshop or Paint Shop Pro - and import it. The size will be 960x960 so you'll need to resize it to 256x256. You also need to "rotate" it 90 degrees counter clockwise (CCW).

    10. Create a 24-bit .TGA at 1280x1280 resolution that is pure black.

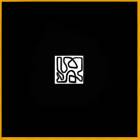
    11. Copy & Paste the 256x256 image into the "center" of the 1280x1280 image.

    Here's a way to center it:
  • Shrink your 1280x1280 by "Zooming Out" (under the "View" tab) and move it to the bottom right of your photo editor.
  • When clicking "Paste", DO NOT move your mouse and "left click" twice.
  • It will paste it perfectly into the center of the 1280x1280, if you haven't moved it.
  • [NOTE: You will now be able to customize your prob map by adding different shades of white or grey to the "ontrack" area or the surrounding area of the track where you want vegetation to go. Also, paint your prob maps black everywhere you place 3D models and DO NOT want trees to show up sticking up through the object.]

    12. Saving:

  • Save it as a 24-bit tga image.
  • Make sure you name your prob map: (yourtrackname)_prob.tga
  • Put it in the folder where your track is located - usually your "Projects" folder.
  •  

    Quality tracks are not easy.....

    Aloha, Maui_cool


    image: Justin's TD logo


    twisteddirt logo
     

    Textures Maps Panel


    Environment Options Panel


    Should look like this.


    Final Product