|
|
|
Motocross
Madness 2
Armadillo
Track Editing Tutorial
Placement Map
Tutorial
by
Maui_cool
|
| |
[This tutorial is for people who have some knowledge of photo editing
programs such as Photoshop & Paint Shop Pro and the MCM 2 Track
Editor "Armadillo".]
Placement
maps are used, in an MCM2 track, to put a particular kind of vegetation
exactly where you want it to be. The following steps will show you
how to make one in the easiest possible way.
1.
Create a "New" 24-bit black image in your photo editing program
at 1280x1280 (pixel) resolution.
2.
You need to "Index" the colors you'll be using to place your vegetation
by:
-
In Photoshop, at the top:
Click:
- "Image"
- "Mode"
- "Indexed Color"
- Click the drop down box where it says "Forced" and pick
"Custom".
- In Paint Shop Pro, at the top:
Click:
- "Colors"
- "Decrease Color Depth"
- "X Colors (4/8 bit)"
When
the "Decrease Color Depth" box pops up:
- Fill in the number of vegetations in the .est file you're
going to use.
[NOTE: You
can open an .est file using "WordPad". The .est files are found in
your Motocross Madness 2/Track Editor/EcoSystem folder.]
- Make sure "Optimized Median Cut" and "Nearest Color" is
checked.
- DO NOT check the "Include Windows Colors" Box
Click:
- "Colors"
- "Edit Palette".
3.
The "Edit Palette" box will pop up which will have 256 color squares.
The first square , in the top left corner, will be "0" - DO NOT
change it, leave it black - then 1, 2, 3, etc.
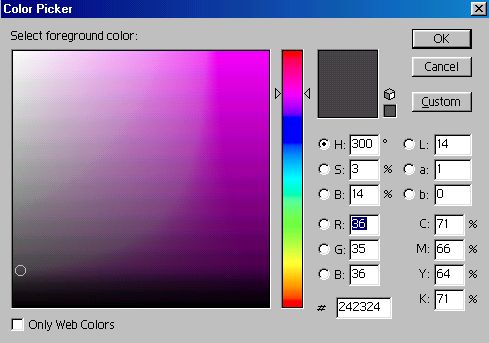
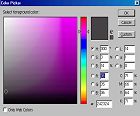
You can change the color of each square by double clicking it causing
a "color picker" to pop up and picking the color you want for that
square/vegetation.
[NOTE: I
use PSP to pick my colors. As you can see, in the photos to the right,
PSP has a "grid" of colors to choose from - I usually pick the colors
in the columns (descending) until I get as many colors as I need for
the .est file I'm going to use. ]
4.
Each palette index color, corresponds directly to the vegetation
list in the .est file you're going to use on your track. So color
"1" will be vegetation "1", color "2" will be vegetation "2" and
so on.
If you look at one the .est files (open
with WordPad), which are in your "TrackEditor/EcoSystem" folder, you
will see "Vegetation_1" ... blah blah blah .... "Vegetation_2" ....
blah blah blah... such as:
[EcoSystem]
Description="Dry Desert"
Method=Auto
PlacementBmp=NONE
NorthAngle=0.0
ProbabilityTga=none
[Vegetation_1]*
Name=DrySaguaro01
BillboardName=DryDesert_LOD3.tga
MeanHeight=30.0
MinHeight=25.0
MaxHeight=35.0
MeanRadius=6.0
MinRadius=5.0
MaxRadius=7.0
ULeft=4
URight=84
VBottom=217
VTop=3
UCenter=49
MeanSlope=20.0
StandardDeviationSlope=3.0
MeanAltitude=0.5
StandardDeviationAltitude=0.5
UsePlanarLighting=0
BlendLODs=0
NumCollisionObjects=1
CollisionObject1=GEOMETRY
[Vegetation_2]
Name=DrySaguaro02
BillboardName=DryDesert_LOD3.tga
MeanHeight=18.0
MinHeight=16.0
MaxHeight=20.0
MeanRadius=3.0
MinRadius=2.0
MaxRadius=3.5
ULeft=134
URight=182
VBottom=166
VTop=3
UCenter=160.5
MeanSlope=25.0
StandardDeviationSlope=4.0
MeanAltitude=0.5
StandardDeviationAltitude=0.5
UsePlanarLighting=0
BlendLODs=0
NumCollisionObjects=1
CollisionObject1=GEOMETRY
Each .est file (Desert, Tropical,
Forest, etc.) has different amounts of vegetations in them, so make
sure you give each piece of vegetation, you want to use, a color.
These vegetation entries (#'s) correspond to the palette index colors
you pick for your placement map. The colors you choose on the palette
is up to you. The particular color you pick does not matter.
In other words, if you look inside
"DryDesert.est" you will see that "Vegetation_4" is DryTumbleweed.
So, everywhere you paint a pixel on your placement map using the
color you gave "Vegetation 4/index 4" you will get a dry tumbleweed
on your project.
Keep in mind that the palette index STARTS WITH ZERO, NOT ONE. ALWAYS
make palette index "zero" BLACK and use that as your background
color. DO NOT assign any shades of black or white to the vegetation.
5.
Now that you have indexed the colors for the .est file you'll be
using, take your track's dismap and:
A. Resize your dismap to 256x256.
B. Turn it 90 degrees counter clockwise
(CCW).
D. Copy & paste it into the center
of your 1280x1280 placement map.
Here's a way to center it:
- Shrink your 1280x1280 by "Zooming Out" (under the "View"
tab) and move it to the bottom right of your photo editor.
- When clicking "Paste", DO NOT move your mouse, then "left
click" twice.
- It will paste it perfectly into the center of the 1280x1280,
if you haven't moved it.
6.
"PAINTING":
- Choose the "Airbrush" and set the "Brush Size" to 1 pixel.
- "Zoom In" on the dismap in the center so you can see exactly
where you're placing your vegetation.
- Now you can start applying vegetation to your Placement Map.]
[NOTE:
"1" pixel equals "1" piece of vegetation - "2"
pixels equal "2" pieces of vegetation, etc.]
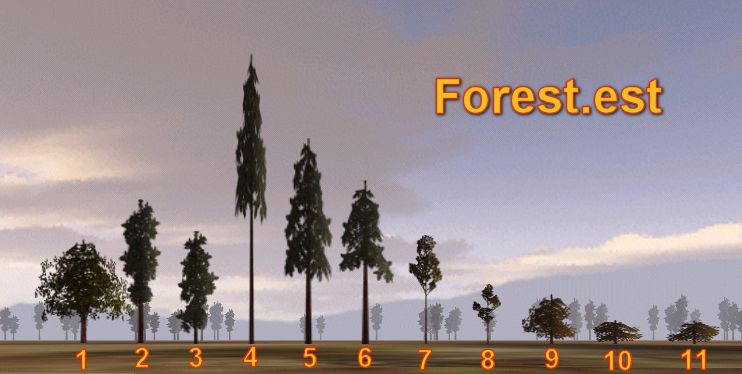
[NOTE:
One thing you can do, to know exactly what the vegetation your placing
looks like, is to:
- Paint each vegetation color in a line off to the side of your
track, on flat ground, spacing them apart.
- Render them in armadillo.
- Take a screenshot of them.
- Crop it to just the row of vegetations.
- And use it for reference when you're placing them.
]
7. "SAVING":
You will be saving 2 copies - one for editing and one
to put in your "Projects" folder.
- Click "Save as"
- Name it (yourprojectname)_place.
- Save in the "Default" format - in Photoshop it will be ".PSD"
- in Paint Shop Pro it will be ".PSP".
- Click "Save as" again.
- Name it (yourprojectname)_place (if you need to).
- Choose "Windows or OS/2 Bitmap (*.bmp")" format.
- Put it in the folder where your track is located - usually
your "Projects" folder.
[NOTE: When
you want to edit it again, edit the "PSD or "PSP" formatted version,
then save as a ".bmp" and "Overwrite" the existing file. ]
8.
Open Armadillo, open your project and generate your trees & vegetation.
[IMPORTANT
NOTE: You will not see the results
of the placement map in the editor until you save and reload your
project in Armadillo.
- Click the "File" tab.
- Click save.
- Re-open your project.
]
[ Note:
You will not have to use as many vegetations
as without a placement map. Set the number at 3000, then see if all
of your color pixels have vegetation where you placed them. You can
check this by:
- Open your project in Armadillo.
- Click the "Hand" at the bottom right.
- Slide your cursor straight up, which will move you forward across
your track (which is the direction they are rendered in), until
you can see the edge of your track.
- If the vegetation doesn't make it to the edge in that area,
add to the number of vegetations to generate - if they go beyond
where you intended, reduce the number of vegetations.
]
|
| |
'a'ohe mea hele hikiwale ma'alahi = Nothing
comes easy.....
Aloha,
Maui_cool
|
| |
|

|
| |
Click Photos to Enlarge

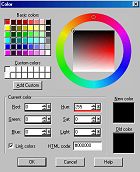
"Decrease Color Depth" Box
|

"Edit Palette" Box
|
"PSP" Color Picker
|
 "Photoshop" Color Picker
|
| |
Click Photos to Enlarge
 Placement Map "No Veg."
|
| |
 Placement Map "With Veg."
|
| |
 Veg. Reference Screenshot
|
| |
|
|